
How to Set Up a Turntable: Audiophile Guide
How to Set Up a Turntable: The Complete Step-by-Step Guide
Analog playback delivers an organic warmth, dynamic texture, and dimensional depth that digital formats rarely capture. However, vinyl is an electromechanical medium. Unlike digital streamers that process binary code with zero mechanical friction, a turntable extracts delicate physical vibrations from microscopic record grooves. If your tonearm, cartridge, or plinth is even slightly misaligned, sound quality deteriorates, distortion increases, and your favorite pressings risk permanent groove damage.
Knowing how to set up a turntable properly unlocks the full musical resolution of your record collection. Whether you are assembling a precision deck like a Rega Planar or dialing in an heirloom transcription deck, following a methodical calibration sequence ensures pitch stability, accurate stereo imaging, and extended stylus life.
This guide outlines every stage of the turntable setup procedure, from selecting an acoustically inert surface to balancing the tonearm, setting tracking force, configuring anti-skate, and integrating phono preamplification into your two-channel stereo system.

Quick Reference Setup Checklist
| Setup Stage | Critical Tool | Primary Objective | Sonic Impact if Overlooked |
| 1. Surface & Leveling | Bubble level / Spirit level | Platter horizontal along X and Y axes | Unbalanced channel output; groove skipping |
| 2. Cartridge Mounting | Hex driver, non-magnetic tweezers | Secure cartridge to headshell/arm | Phase cancellation; harsh tracking distortion |
| 3. Alignment Geometry | Two-point protractor (Baerwald/Löfgren) | Minimize tangential tracking angle error | Sibilance; inner-groove distortion (IGD) |
| 4. Vertical Tracking Force | Digital stylus force gauge | Apply manufacturer’s target gram weight | Sibilant highs (too light) or dull dynamics (too heavy) |
| 5. Tonearm Height (VTA/SRA) | Acrylic VTA block gauge | Stylus rake angle aligned at ~92° | Smeared soundstage; skewed tonal balance |
| 6. Anti-Skate (Bias) | Graduated dial or hanging weight | Counteract inward centripetal pull | Uneven stereo imaging; lopsided stylus wear |
| 7. Phono Integration | Low-capacitance interconnects | RIAA equalization and signal boost | Severe low output, hum, or excessive noise floor |
1. Preparing the Environment: Isolation and Leveling
A turntable acts as a seismic detector. The stylus cantilever responds to microscopic deviations measured in microns. If footsteps, ambient room vibrations, or acoustic energy from your loudspeakers vibrate the plinth, the stylus picks up those resonances, producing muddy bass, a collapsed soundstage, or feedback howling.
Choosing the Ideal Surface
Position your turntable away from the direct acoustic path of your speakers. Avoid setting the turntable on the same cabinet, credenza, or shelf as your loudspeakers, as low-frequency vibrations travel directly through shared furniture.
For optimal mechanical isolation:
- Use a heavy, rigid piece of audio furniture, such as dedicated equipment racks with decoupled shelves.
- On suspended wood floors prone to footfall vibration, mount a dedicated turntable wall shelf anchored into wall studs.
- Ensure clear access around the plinth for dust cover removal and routine maintenance.
Leveling the Plinth and Platter
A platter that leans even one degree introduces gravitational pull that fights the tonearm bearings, creating channel imbalances and premature vinyl wear.
Place a circular bubble spirit level directly in the center of the bare platter (remove any felt or rubber slipmat first). Adjust the turntable’s threaded isolation feet until the bubble sits dead-center. Check the level across multiple axes: front-to-back, left-to-right, and diagonally. If your turntable uses fixed feet, place precision isolation shims or adjustable isolation pads beneath the chassis until the platter is flat.
2. Platter and Drive System Installation
Most hi-fi turntables use either a belt-drive system or a direct-drive motor. Belt-drive designs decouple the motor from the platter using an elastic belt, preventing mechanical motor vibrations from reaching the sensitive stylus.
Belt-Drive Assembly
- Wipe the motor pulley and the inner sub-platter rim with 99% isopropyl alcohol to remove skin oils that cause belt slippage.
- Loop the silicone or rubber drive belt around the motor pulley and the sub-platter. Avoid over-stretching the belt during installation.
- Gently place the primary platter onto the center spindle, ensuring it seats firmly without wobble.
- Rotate the platter by hand for five to ten revolutions to allow the belt to settle evenly on the drive path.
Direct-Drive Setup
For direct-drive systems, lower the platter straight down onto the central motor spindle. Avoid angling the platter during placement to prevent damaging the magnetic drive bearings or spindle threads.
3. Cartridge Installation and Geometry Alignment
Installing the phono cartridge requires steady hands, patience, and non-magnetic tools. The phono cartridge converts mechanical groove modulations into tiny electrical currents (measured in millivolts). Misalignment produces severe tracking distortion and channel crosstalk.
Connecting the Leads
The rear of the cartridge features four terminal pins color-coded to match the tonearm lead wires:
- White: Left channel positive (L+)
- Blue: Left channel ground (L-)
- Red: Right channel positive (R+)
- Green: Right channel ground (R-)
Using non-magnetic needle-nose tweezers, gently grasp the metal clips at the end of the tonearm wires never pull directly on the delicate wire itself. Push the clips onto the cartridge pins until snug. Secure the cartridge body to the headshell using the manufacturer-supplied screws, tightening them just enough to hold the cartridge in place while still permitting forward and backward adjustments.
Using an Alignment Protractor
Because pivoted tonearms travel in an arc across the record rather than a straight line, the cartridge can only achieve perfect tangential alignment with the groove at two distinct points (the null points).
To align your cartridge:
- Place a cartridge alignment protractor (Baerwald, Löfgren, or Stevenson geometry) over the spindle.
- Disable anti-skate or set it to zero.
- Lower the stylus tip carefully onto the crosshairs of the outer null point.
- Look directly down and from the front: the sides of the cartridge body (or, ideally, the cantilever itself) must rest parallel to the grid lines printed on the protractor.
- Move the tonearm to the inner null point and inspect alignment.
- Gently slide and twist the cartridge within the headshell slots until the cantilever aligns with the grid lines at both null points simultaneously. Once aligned, tighten the mounting screws firmly without overtightening.
For technical deep-dives into mechanical audio standards and groove geometry specifications, review documentation from educational audio organizations such as the Audio Engineering Society to see how cutting-lathe angles influence playback physics.
4. Calibrating Balance and Vertical Tracking Force (VTF)
Every phono cartridge requires a specific downward mechanical pressure the Vertical Tracking Force (VTF) to keep the stylus seated inside the record groove without bottoming out the cantilever suspension.
Finding “Zero Balance” (Floating the Arm)
Before setting tracking force, establish the zero-gravity baseline:
- Ensure the stylus guard is removed (exercise extreme caution around the bare needle).
- Set the anti-skate control to 0.
- Lower the tonearm cueing lever so the arm moves freely.
- Rotate the heavy counterweight at the rear of the tonearm back and forth until the tonearm hovers horizontally in free space, parallel to the platter, without dipping down or swinging up.
Setting Tracking Force with Counterweight vs. Digital Scale
Once the arm floats horizontally:
- Hold the counterweight body steady and rotate only the numbered front dial ring until “0” aligns with the center index line on the tonearm barrel.
- Turn the entire counterweight forward (inward toward the pivot) until the index line matches your cartridge manufacturer’s recommended tracking weight (typically between 1.5 and 2.2 grams for moving magnet cartridges).
While built-in counterweight markings provide a rough baseline, precision setups benefit significantly from a digital stylus force gauge. Rest the stylus tip directly onto the measurement pad of the digital scale at platter height. Digital scales eliminate mechanical dial play and measure true tracking force down to 0.01 grams, safeguarding your vinyl and maximizing dynamic range.
5. Adjusting Anti-Skate (Bias Compensation)
As a spinning record turns beneath the stylus, friction pulls the tonearm inward toward the center spindle. This inward pull centripetal force causes the stylus to push harder against the inner groove wall (the left stereo channel) while losing steady contact with the outer groove wall (the right stereo channel).
Anti-skate applies a gentle outward counterforce to center the stylus between both groove walls.
- Rule of Thumb: On most modern tonearms, set the anti-skate dial to match your calibrated Vertical Tracking Force. For instance, if your VTF is 1.8 grams, start with your anti-skate dial set to 1.8.
- Fine-Tuning: If you observe the stylus deflecting to the left or right when it drops into the lead-in groove, or if the soundstage leans noticeably toward one speaker, adjust the bias in small increments until stereo balance stabilizes.
6. Fine-Tuning Tonearm Height: VTA and Azimuth
Advanced turntables feature adjustments for Vertical Tracking Angle (VTA) and Azimuth, allowing you to fine-tune soundstage focus, high-frequency smoothness, and vocal clarity.
Vertical Tracking Angle (VTA) and Stylus Rake Angle (SRA)
VTA refers to the angle of the tonearm relative to the record surface. When a record plays, the tonearm should rest parallel to the record platter.
- If the tonearm base is too high (arm slopes downward toward the stylus), the sound can become thin, bright, and analytical.
- If the tonearm base is too low (arm slopes upward toward the stylus), low frequencies often become sluggish, boomy, and ill-defined.
Place a lined acrylic alignment block next to the tonearm tube while playing an average-weight LP. Loosen the pillar screw at the arm base and adjust the height until the center line of the tonearm tube runs parallel to the lines on the gauge.
Azimuth
Azimuth describes the horizontal tilt of the cartridge when viewed directly from the front. The stylus diamond must sit perpendicular (90 degrees) to the record surface. If the cartridge tilts slightly to the left or right, channel separation degrades, introducing crosstalk. Use a small mirror placed on the platter: inspect the reflection of the cartridge body and stylus to ensure the reflection forms a straight line with the cartridge face.
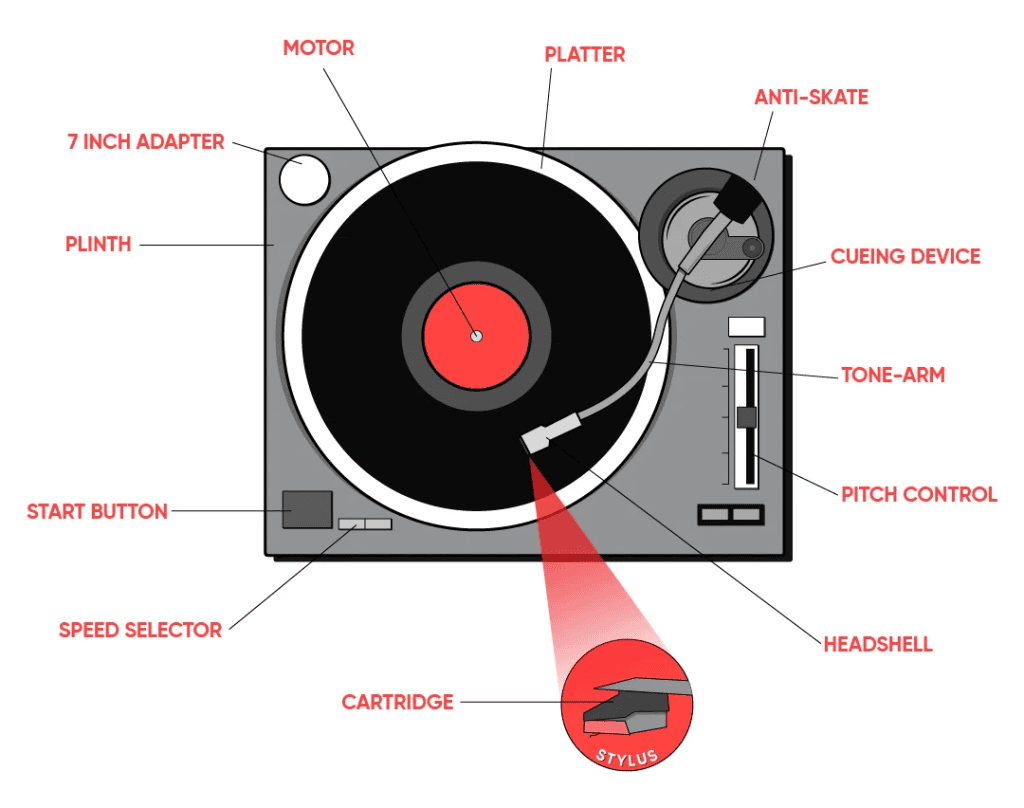
7. Connecting to Amplification: Phono Stages and Grounding
A cartridge generates a tiny electrical signal that line-level inputs (such as AUX, CD, or Tape) cannot process directly. Connecting your deck requires appropriate equalization and amplification.
Phono Preamp vs. Line-Level Inputs
The signal cut into a vinyl groove undergoes RIAA equalization during the mastering process, which rolls off bass frequencies and boosts treble to physically fit audio onto the disc. A phono preamplifier performs two critical tasks:
- It applies the inverse RIAA curve to restore natural bass response and tame high frequencies.
- It amplifies the weak cartridge signal (from millivolts up to standard line-level strength).
If your turntable or integrated amplifier features a switchable internal phono stage, make sure the switch settings align:
- If plugging into an amplifier’s dedicated PHONO input, switch the turntable’s internal preamp to THRU / OFF.
- If plugging into an AUX / LINE input, switch the turntable’s internal preamp to ON / LINE.
- Running two phono preamps simultaneously results in severe signal distortion, while running none leaves the sound faint, tinny, and virtually unlistenable.
Grounding to Eliminate 60Hz Hum
Most audiophile turntables feature a separate thin copper ground wire alongside the Left/Right RCA cables. Fasten this spade lug securely to the ground post on your external phono preamp or amplifier chassis. This connection bonds the tonearm assembly to the audio ground, eliminating ground loops and low-frequency electrical hum.
For enthusiasts building dedicated analog systems, partnering your turntable with carefully chosen tube amplification, high-efficiency loudspeakers, and isolated racks brings out the tactile qualities of vinyl recordings. You can explore curated two-channel systems and audition analog configurations through our team at In Living Stereo.
Final Playback Protocol and Long-Term Maintenance
Once you understand how to set up a turntable, consistent playback habits preserve your calibrated settings:
- Dry Clean Every Side: Use an anti-static carbon fiber or goat-hair brush across the record surface before dropping the needle to prevent dust from packing into the stylus tip.
- Keep the Stylus Clean: Clean the stylus diamond regularly using a soft dry brush (stroking strictly back-to-front) or specialized stylus-cleaning gel pads.
- Use the Cueing Lever: Avoid dropping the tonearm by hand. The hydraulic damping in the cueing lever lowers the stylus gently onto the lead-in groove, preventing cantilever shock and accidental record gouges.
Taking the time to calibrate your turntable transforms record listening from a finicky chore into an immersive sonic experience. When geometry, balance, and isolation work in harmony, background noise fades away, leaving only pure, expressive music in the room.